  |
Last One Holding The Chalk...Usually Wins!(October 2002)Assortment of plays, drills and ideas to help your program improve.
Click TV below to view a short video clip from Jamie Angeli's Primary / Secondary Pass Option Offensive Attack System. This video is currently #5 on the bestseller's list at Sysko's Basketball Books and Videos and has been in the Top 10 for the past two and a half years. You can purchase this video or download the "E-book" at Jamie Angeli's website for a fraction of the normal cost. Find it at our Basketball Store. (Low
Band-width (dial-up modem------>) (High
Bandwidth (DSL / Cable, etc.----->)
DRILL TIME - "BARBED WIRE" This is a full-court team drill that will really do a good job of helping you teach and stress some very solid points with your team. They are: 1) Catching and facing the basket (or up the floor) every time they catch the basketball...HUGE POINT! 2) Moving without the basketball - key point - it is not enough for you to get open, but get open at a point where your teammate can deliver the pass. So many times you see players run down the floor and yell for the ball because they are open -- while the person with the ball is being double-teamed and could not deliver a full court pass on his best day! Stress to your players how important it is to not only move to receive the ball, but to move after you have passed it! That person is your best target as your defense on that person usually is in the air trying to deflect the pass or has turned his head to see where the ball has gone. 3) Learning to come to the basketball and meet each pass with hands up. 4) Not to panic under pressure and go too fast - usually the number one reason for turnovers. Play under control, or, as Coach Wooden always said, "Be quick, but don't hurry!" 5) Being strong with the basketball. Stepping and / or pivoting through double screens. Learning to avoid pressure, dribbling the trap back away clearing a passing lane for your partner to enter, etc. 6) Teamwork! I can't stress how important it is in this drill and how well it will help you teach the concept. Now, some of you will have players that put their head down and dribble through the entire maze and score the basket. That will be rare so don't panic if that happens. You won't have to spend a lot of time correcting that, it will take care of itself. More times than not, one person beating this drill by themselves usually spells T-U-R-N-O-V-E-R.
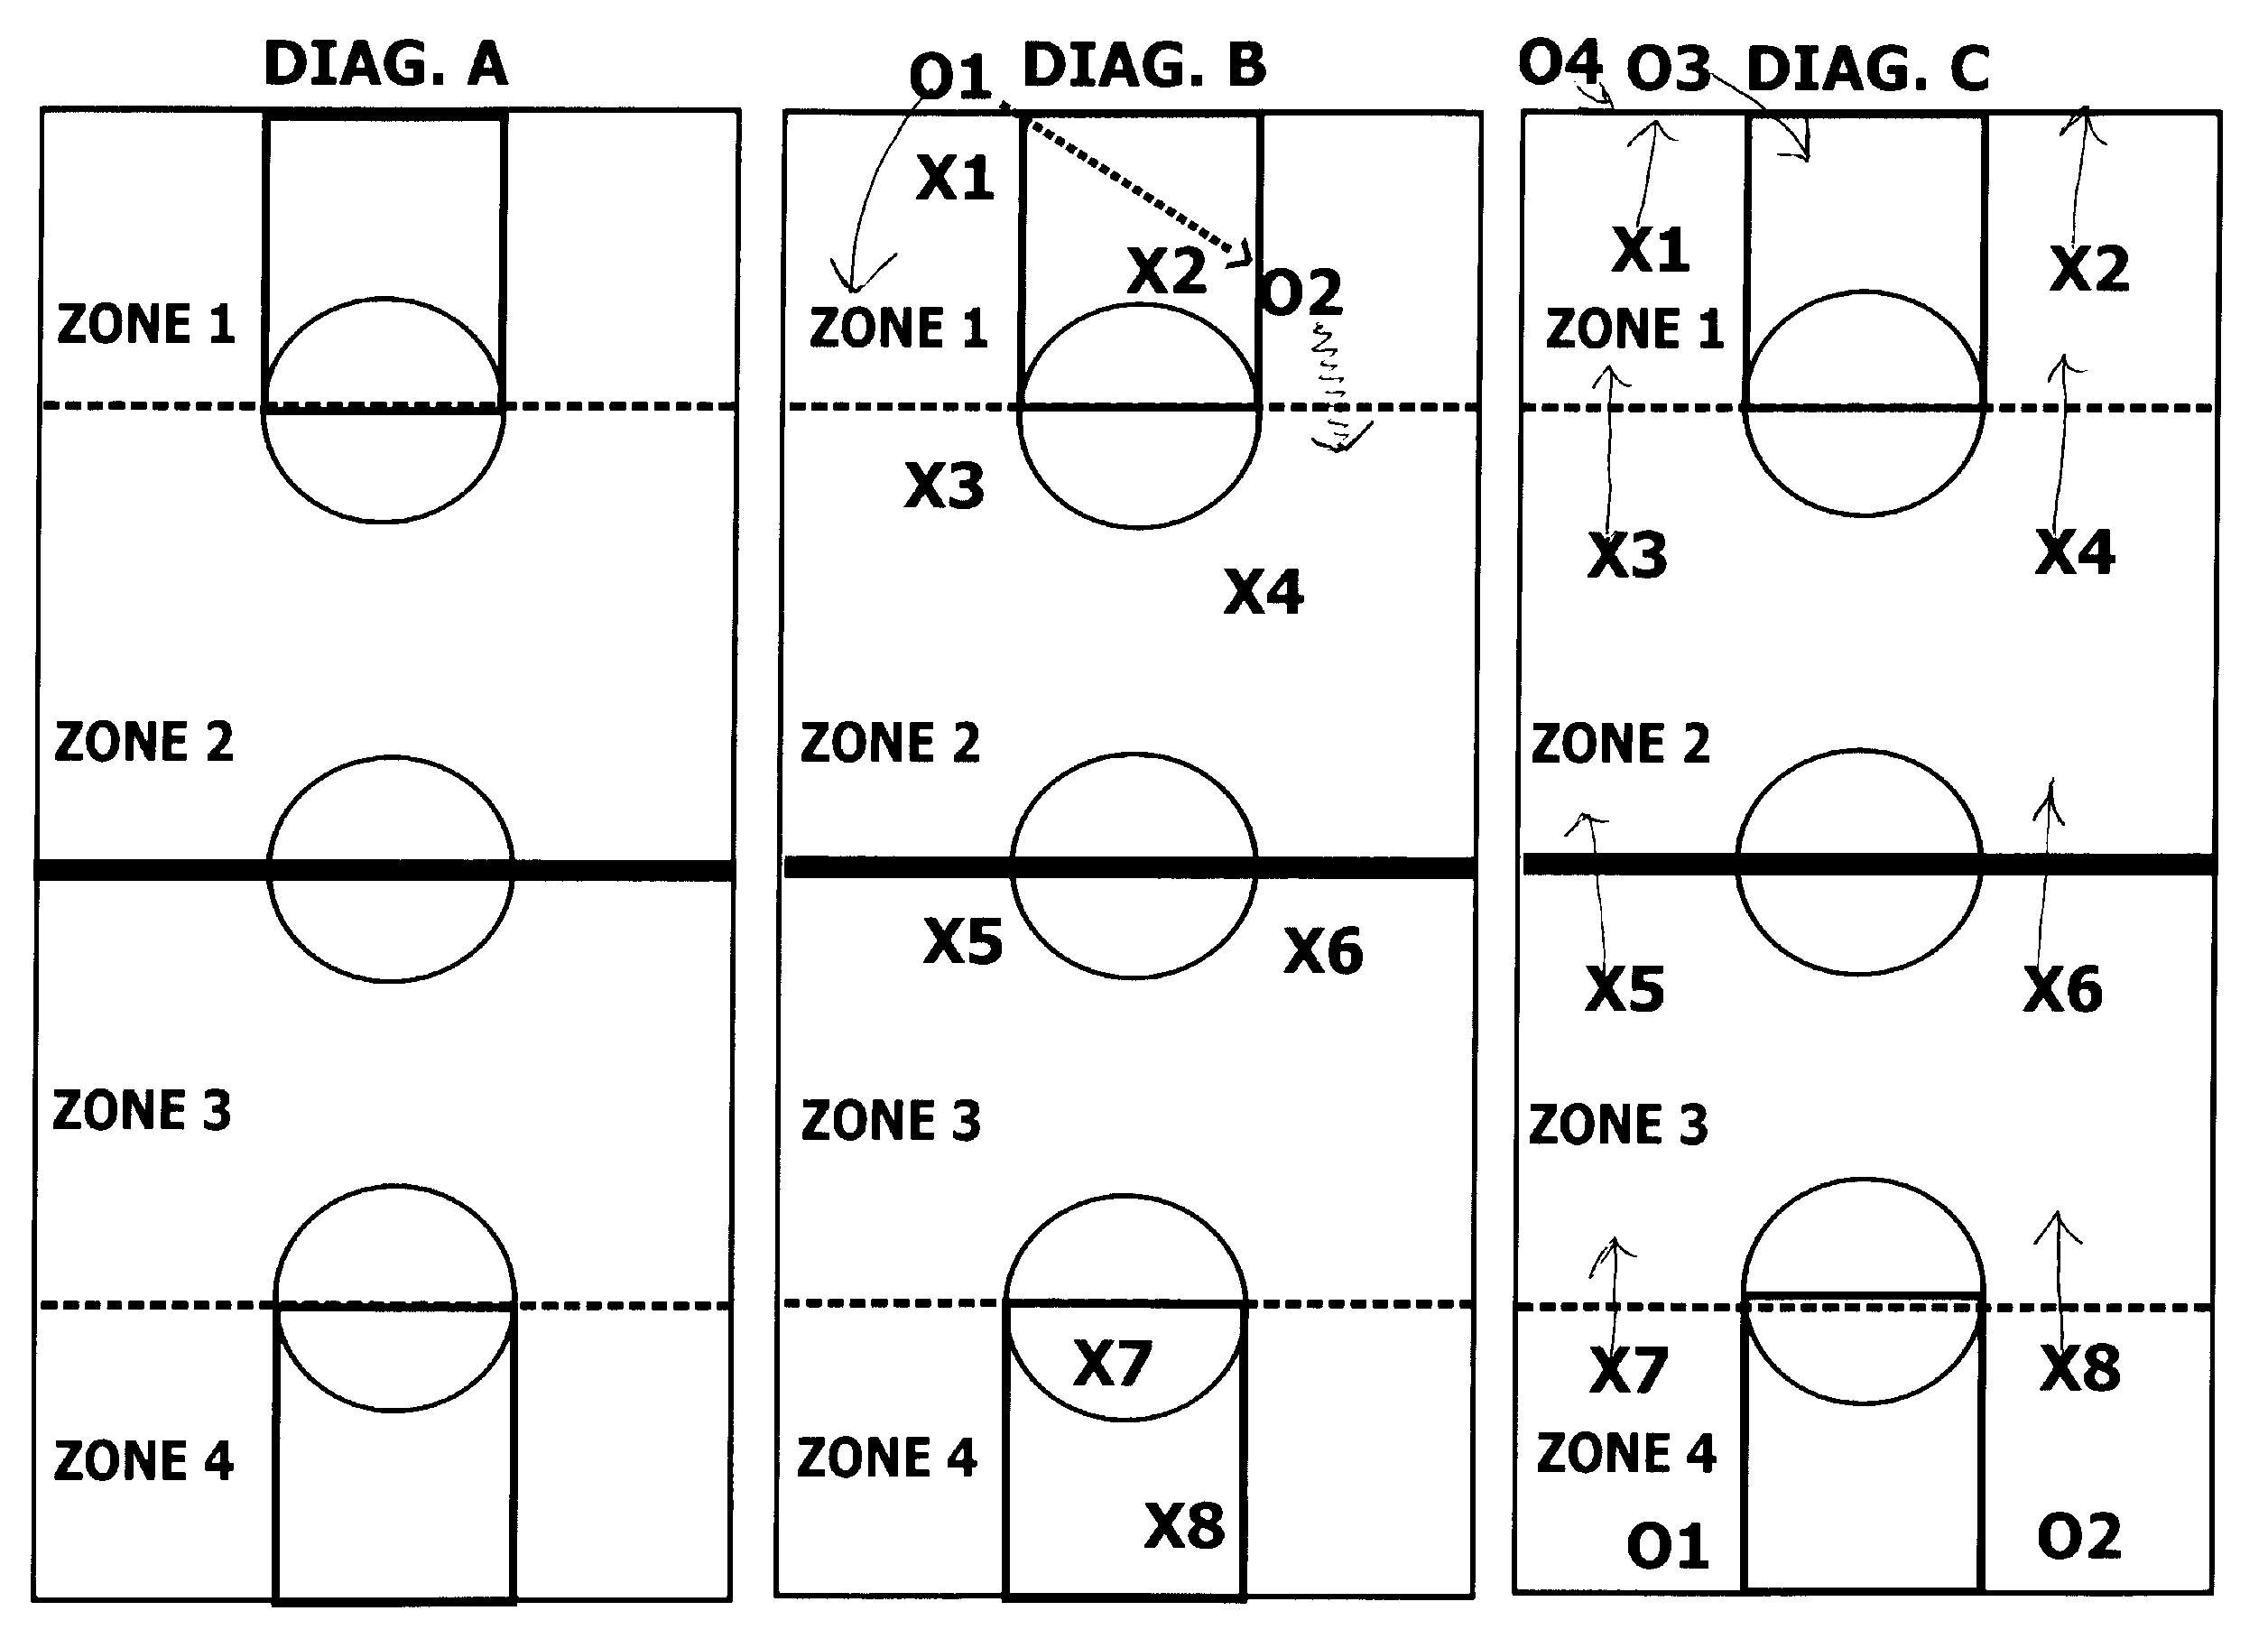
Allright...on to the drill. It isn't difficult and you should be able to implement this drill right away! I promise - you will love it! 1) Diagram A shows how the drill is set up. Break your team up into groups of (2). First let them know about the four zones on the floor. It is imperative that they know where they are and that they are to remain in that zone until each group has been completed. More about that later. 2) In Diagram A, you see that X1 and X2 occupy Zone 1; X3 and X4 occupy Zone 2; X5 and X6 occupy Zone 3; and X7 and X8 occupy Zone 4. Each group is to play defense as a tandem in that zone once the ball enters their area. They can play straight up man to man or they can trap the ball, it is totally up to them. 3) Diagram B shows the offensive players (O1 and O2) standing out of bounds ready to step in and start the drill. O1 tries to inbound the ball to his partner O2 and together they try and go through the "barbed wire" all the way down the floor and will attempt to score at the end. Again, how the defend the offensive players is their decision. They may decide to double team O2 and keep him from inbounding the ball. If there is a 5 second count, that is a turnover and we quickly rotate (described in #6). Hopefully, you will get a varied bunch of defenders, some trapping, some playing straight up man to man. This will teach your players to read, recognize and react. 4) Again, the defenders in each zone cannot leave their zone, they must wait for the offensive players to enter their area before they "attack". It is X7 and X8's job at the end to stop them from scoring if they make it that far. 5) You MUST officiate this drill. If they are fouled or if the ball goes out of bounds and it remains their ball, the drill keeps going with the same two offensive players -- just as you would in a game if you were trying to break the press. Take the ball out of bounds at the point they were fouled or where the ball went out of bounds. This may be a time to "put the whistle away" if you no what I mean. Teach them to be strong with the basketball and not to be looking to be bailed out by an official. You have to keep an eye on it, however, or it could become a "blood bath" quickly. When they turn it over and the ball goes to the defense, that is your key to rotate immediately to the next two offensive people in line. 6) Diagram C - Rotations - the rotations are fairly simple, but must be done quickly and in an organized fashion. When your two offensive players (X1 and X2 in this example) either score or turn the ball over, they become the last defenders in Zone 4. Everyone else moves up a zone, as you see in Diagram C. X1 and X2 leave the floor and get in the back of the offensive line. O3 and O4 step in and become the next two offensive players attacking the "barbed wire". 7) I usually put about 15 - 20 minutes on the clock and ask the players to keep track of how many baskets (if any) there group scores. You can have the winners sit out and cheer for the (non-winners) as they run a quick sprint or two. Your call here on this one coach!
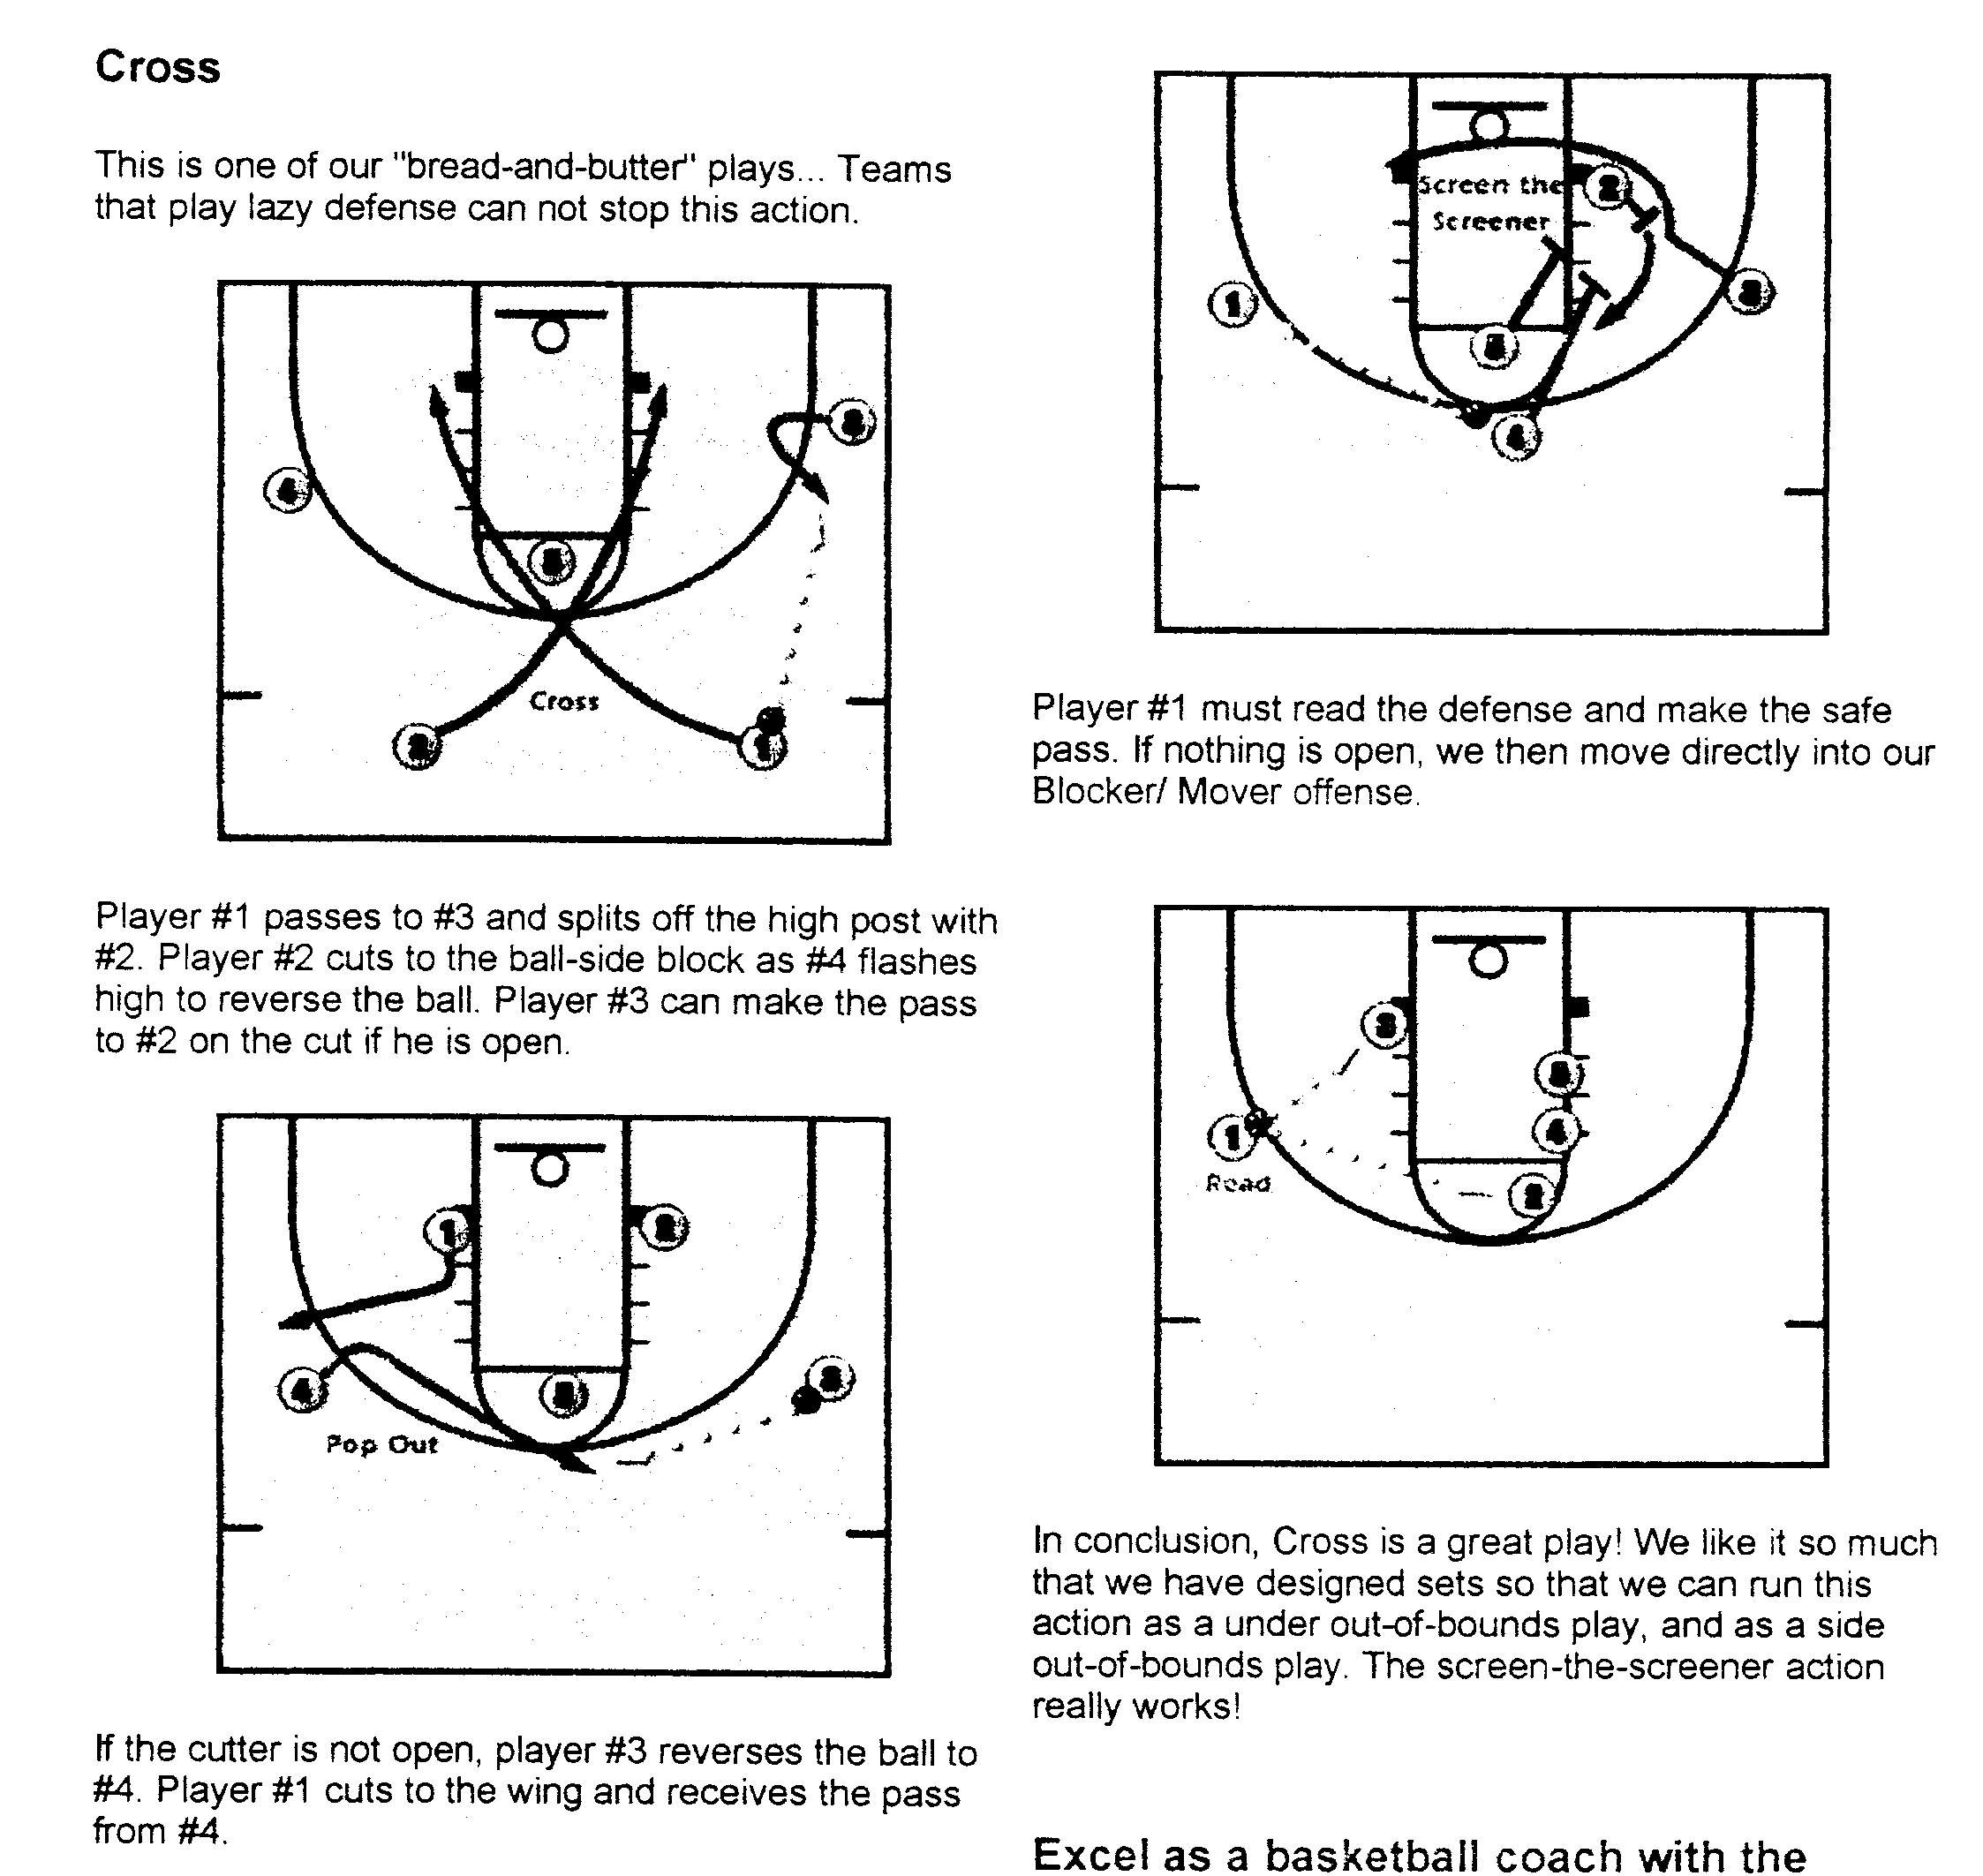
YOUR SET PLAY FOR THE MONTH OF OCTOBER
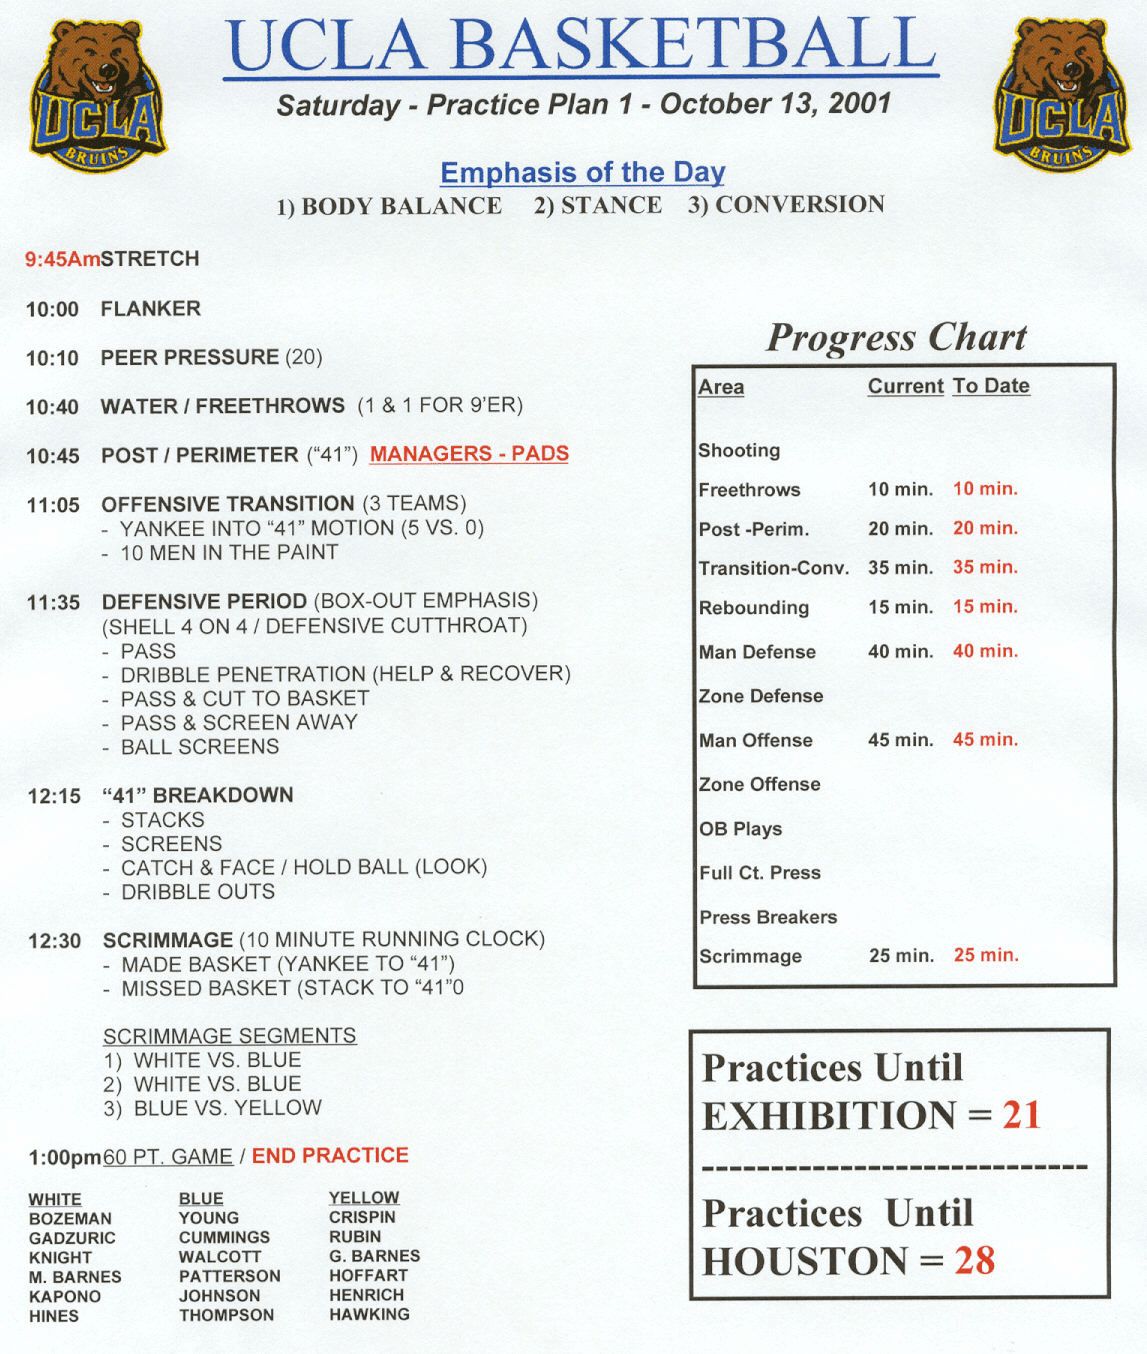
PRACTICE PLAN DEVELOPMENT I am enclosing a sample practice plan from our program. As you can see, the practice plan below was our first practice of the year last season. I am providing you this practice plan to call your attention to a very important aspect of our practice plans. Notice the boxed area called "Progress Chart". I promise you if you add this section to your practice plans it will take a lot of the stress involved in getting ready for the start of the season. Charting the time you spend on each area of the game as well as how many practices you have remaining until your first scrimmage or game can help you and your staff better plan your practice strategy. We often get to a few days away from the first game and realize you don't have everything in you wanted. This "progress chart" can help give you a quick look at what needs to be worked on in future practices and how much time you have to get it all in. Also, this is a great way to quickly check and see that you are devoting the necessary time to the areas of the game you feel are most important. The "progress chart" is easy to keep - simply update the new practice plan with the information from your last practice plan. Add the current practice times to your "current" column and then add that total to yesterday's practice plan total and you have your "to date" column total and you are all set. Give it a try - you will not be disappointed and you will be asking yourself why you hadn't done it sooner. Good Luck!
|


